Friday, January 31, 2014
Roasted Brussels Sprouts in Spaghetti Squash Nests
This is a bit of a gimmick more than a recipe, but at least its an attractive and good-tasting gimmick. Roasted Brussels sprouts make great "eggs" in little nests of spaghetti squash tossed with cheese and herbs. Serve them as their own course as part of a formal dinner, or with a piece of roasted or poached chicken breast alongside and call it the whole thing.
This was a spaghetti squash I grew myself, and it separated into nice clean strands, just as it should. Ive had more troubles with purchased spaghetti squash being too soft and mushy, which is really annoying when they are not cheap. Pity we are not good growers of squash, generally getting few and small ones. I hope that one of these days we will get the amendments right and win the battle of the bugs.
Makes 4 to 6 servings
1 hour 20 minutes - 20 minutes prep time

1 1 kilo (2 pounds) spaghetti squash
1 kilo (2 pounds) Brussels sprouts
2 tablespoons butter
1/2 cup finely grated Parmesan cheese
1/4 teaspoon salt
1/2 teaspoon rubbed oregano
1/2 teaspoon rubbed savory
1/2 teaspoon rubbed thyme
freshly ground black pepper to taste
a little more grated Parmesan to sprinkle over, if you like
Preheat the oven to 375°F. Wash the squash, and stab it in several places with a fork. Bake it - on a tray; it may leak - for 40 to 45 minutes, until soft.
Meanwhile, wash and trim the Brussels sprouts, and cut a cross in the base of each one to facilitate faster cooking. Toss them with the oil in a baking pan, and put them in the oven when the squash is about half done (20 or 25 minutes still to go). Sprinkle them with a little salt first if you like.
Have the butter and grated cheese standing by, along with the seasonings. When the squash is done, remove it from the oven and cut it in half. Scoop out and discard the seeds, etc from the middles, then use a fork to pull out the strands. put them in a bowl and toss them with the butter, cheese and seasonings.
Divide the spaghetti squash onto individual serving plates, and form into little nests. Serve with the roasted Brussels sprouts divided amongst the nests, and with a little more cheese sprinkled over top if you like. You will need to work quickly as I found the spaghetti squash cooled off fairly quickly. They could go back in the oven to stay warm if you need a few extra minutes to get other parts of the meal ready, as long as your plates are happy with that.
Last year at this time I made White Chocolate Mousse with Cranberries, on the occasion of my mothers birthday. I was just thinking about what a fabulous knock-out dessert it was, and that I should make it for Christmas dinner this year, and there it is. Oh yeah, I think so. It was SOOO good.
Read More..
This was a spaghetti squash I grew myself, and it separated into nice clean strands, just as it should. Ive had more troubles with purchased spaghetti squash being too soft and mushy, which is really annoying when they are not cheap. Pity we are not good growers of squash, generally getting few and small ones. I hope that one of these days we will get the amendments right and win the battle of the bugs.
Makes 4 to 6 servings
1 hour 20 minutes - 20 minutes prep time
1 1 kilo (2 pounds) spaghetti squash
1 kilo (2 pounds) Brussels sprouts
2 tablespoons butter
1/2 cup finely grated Parmesan cheese
1/4 teaspoon salt
1/2 teaspoon rubbed oregano
1/2 teaspoon rubbed savory
1/2 teaspoon rubbed thyme
freshly ground black pepper to taste
a little more grated Parmesan to sprinkle over, if you like
Preheat the oven to 375°F. Wash the squash, and stab it in several places with a fork. Bake it - on a tray; it may leak - for 40 to 45 minutes, until soft.
Meanwhile, wash and trim the Brussels sprouts, and cut a cross in the base of each one to facilitate faster cooking. Toss them with the oil in a baking pan, and put them in the oven when the squash is about half done (20 or 25 minutes still to go). Sprinkle them with a little salt first if you like.
Have the butter and grated cheese standing by, along with the seasonings. When the squash is done, remove it from the oven and cut it in half. Scoop out and discard the seeds, etc from the middles, then use a fork to pull out the strands. put them in a bowl and toss them with the butter, cheese and seasonings.
Divide the spaghetti squash onto individual serving plates, and form into little nests. Serve with the roasted Brussels sprouts divided amongst the nests, and with a little more cheese sprinkled over top if you like. You will need to work quickly as I found the spaghetti squash cooled off fairly quickly. They could go back in the oven to stay warm if you need a few extra minutes to get other parts of the meal ready, as long as your plates are happy with that.
Last year at this time I made White Chocolate Mousse with Cranberries, on the occasion of my mothers birthday. I was just thinking about what a fabulous knock-out dessert it was, and that I should make it for Christmas dinner this year, and there it is. Oh yeah, I think so. It was SOOO good.
Masala waly wadas
Masala waly wadas

Ingredients
- Potatoes boiled and coarsely mashed 4
- Anar dana 2 tsp crushed
- Lemon juice 2 tsp
- Brown onion crushed 2 tsp
- Coriander leaves chopped 2 tbsp
- Mint leaves chopped 1 tbsp
- Crushed red pepper 2 tsp
- Allspice ½ tsp
- Salt 1 tsp
- Chat masala ½ tsp
Ingredients for batter
- Gram flour 1 cup
- Salt ¼ tsp
- Soda by carb ¼ tsp
Method for batter
- Make into a smooth thcikish batter with water.
Method for wada
- Put all in a bowl and mix well, make into balls, dip in prepared batter and deep fry.
Thursday, January 30, 2014
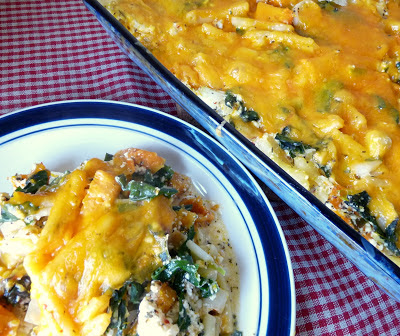
Cheesy Pasta Casserole with Squash Kale
Its another cheesy pasta casserole, with squash and kale this time. This one is more rich and elaborate than the Broccoli Kugel I made last week, and takes longer to make because of needing to pre-cook the squash in particular. However, it is not difficult and could be broken up into sections and made at least partially in advance. I expect it to freeze well; in fact I have made an extra batch and stuck it in the freezer to form the vegetarian main dish for our Christmas dinner.
If you made this earlier in the season you could use Swiss chard in this, but by now it is pretty much gone and you will need to use kale - nothing wrong with that!
8 servings
2 1/2 hours - 1 3/4 hours prep time
Pre-Cook the vegetables & Pasta:
1 large (1.5 kilos, 3 pounds) butternut squash
4 tablespoons mild vegetable oil
3 medium leeks
4 to 5 cloves of garlic
1 bunch kale (or Swiss chard)
250 grams (1/2 pound) stubby pasta
Preheat the oven to 350°F.
Cut the squash into chunks, and peel it and discard the seeds (and by discard, I mean wash them, and toss them with oil and salt and roast them, but thats another dish.) Cut the peeled squash pieces into smallish bite sized pieces, and spread them on a baking tray. Toss them with 3 tablespoons of the oil. Roast for 30 minutes, until fairly soft. Wash the kale and chop it finely, discarding any tough stems.
Put a large pot of salted water on to boil.
Meanwhile, wash, trim and chop the leeks, and rinse them again and drain well. Peel and mince the garlic. Heat the remaining tablespoon of oil in a large skillet, and gently cook the chopped leeks until soft and translucent. Do not let them brown. Add the garlic and stir in well, for just a minute, then remove from the heat.
When the water boils, add the pasta and cook for HALF the time recommended on the package. When there are 2 minutes more for it to cook, add the finely chopped kale. When done, drain and rinse in cold water, and drain well.
Either leave the oven on when the squash is roasted, or preheat it to 350°F again just before you finish the casserole.
Finish the Casserole:
450 grams (1 pound) cottage cheese
450 grams (1 pound) ricotta cheese
100 grams (1/4 pound) feta cheese, crumbled
2 teaspoons rubbed basil
2 teaspoons rubbed oregano
1/4 teaspoon crushed red pepper
salt & pepper to taste
250 grams (1/2 pound) old Cheddar or Colby cheese, grated
When the pasta and kale have been well drained, return them to the cooking pot. Add the roasted squash and the cooked leeks and garlic. Add all the remaining ingredients, except the grated Cheddar or Colby cheese. As usual, the amount of salt will depend on how salty your cheeses are. I do find fresh cheeses need to have some, so maybe about half a teaspoon. Mix well.
Spread the mixture out evenly in a 9" x 13" baking (lasagne) pan. Top with the grated Cheddar or Colby. Bake at 350°F for 45 to 50 minutes, until the cheese on top is bubbling. Let rest 10 minutes before serving.
Last year at this time I made Jerusalem Artichoke Caponata.
Read More..
If you made this earlier in the season you could use Swiss chard in this, but by now it is pretty much gone and you will need to use kale - nothing wrong with that!
8 servings
2 1/2 hours - 1 3/4 hours prep time
Pre-Cook the vegetables & Pasta:
1 large (1.5 kilos, 3 pounds) butternut squash
4 tablespoons mild vegetable oil
3 medium leeks
4 to 5 cloves of garlic
1 bunch kale (or Swiss chard)
250 grams (1/2 pound) stubby pasta
Preheat the oven to 350°F.
Cut the squash into chunks, and peel it and discard the seeds (and by discard, I mean wash them, and toss them with oil and salt and roast them, but thats another dish.) Cut the peeled squash pieces into smallish bite sized pieces, and spread them on a baking tray. Toss them with 3 tablespoons of the oil. Roast for 30 minutes, until fairly soft. Wash the kale and chop it finely, discarding any tough stems.
Put a large pot of salted water on to boil.
Meanwhile, wash, trim and chop the leeks, and rinse them again and drain well. Peel and mince the garlic. Heat the remaining tablespoon of oil in a large skillet, and gently cook the chopped leeks until soft and translucent. Do not let them brown. Add the garlic and stir in well, for just a minute, then remove from the heat.
When the water boils, add the pasta and cook for HALF the time recommended on the package. When there are 2 minutes more for it to cook, add the finely chopped kale. When done, drain and rinse in cold water, and drain well.
Either leave the oven on when the squash is roasted, or preheat it to 350°F again just before you finish the casserole.
Finish the Casserole:
450 grams (1 pound) cottage cheese
450 grams (1 pound) ricotta cheese
100 grams (1/4 pound) feta cheese, crumbled
2 teaspoons rubbed basil
2 teaspoons rubbed oregano
1/4 teaspoon crushed red pepper
salt & pepper to taste
250 grams (1/2 pound) old Cheddar or Colby cheese, grated
When the pasta and kale have been well drained, return them to the cooking pot. Add the roasted squash and the cooked leeks and garlic. Add all the remaining ingredients, except the grated Cheddar or Colby cheese. As usual, the amount of salt will depend on how salty your cheeses are. I do find fresh cheeses need to have some, so maybe about half a teaspoon. Mix well.
Spread the mixture out evenly in a 9" x 13" baking (lasagne) pan. Top with the grated Cheddar or Colby. Bake at 350°F for 45 to 50 minutes, until the cheese on top is bubbling. Let rest 10 minutes before serving.
Last year at this time I made Jerusalem Artichoke Caponata.
Orechiette with Chickpeas


The original recipe for this dish can be found at epicurious or by clicking HERE.
Orechiette with Chickpeas
Adapted from Epicurious
Ingredients:
1 bag of dried chickpeas, picked over
2 garlic cloves, left whole, plus 4 garlic cloves, finely chopped
2 bay leaves
extra-virgin olive oil
1 large onion, finely chopped
4 celery ribs, finely chopped
4 medium carrots, finely chopped
1/4 to 1/2 teaspoon dried hot red-pepper flakes
3/4 pound - 1 pound vine-ripened tomatoes, finely chopped
1 cup water or chicken stock (plus more as needed)
1/3 cup finely chopped flat-leaf parsley
handful of fresh basil, chopped
1 pound orrechiette
Directions:
Soak chickpeas in water to cover by 2 inches overnight (8 hours) or quick-soak (see cooks note, below), then drain.
Simmer chickpeas with whole garlic cloves and bay leaf in water to cover by 2 inches in a 4- to 5-quart pot, partially covered with lid, adding more water if necessary, until tender, 1 to 1 1/4 hours. Drain chickpeas and discard garlic and bay leaf.
Heat oil in a large heavy pot over medium heat until it shimmers, then cook onion, celery, carrots, chopped garlic, red-pepper flakes (to taste), salt and pepper, covered, stirring occasionally, until vegetables are softened, about 12 minutes. Add tomatoes, water or chicken stock, more salt and simmer, uncovered, until vegetables are tender and sauce is slightly thickened, about 5 minutes. Using an immersion blender, puree sauce. If sauce is very thick or if you want more sauce add more liquid. Add chickpeas and cook until tender. Stir in parsley and basil, adjust seasoning to taste.
Cook orrechiette in salted boiling water until al dente and toss with sauce. Again, if sauce is too thick just add more liquid (at this point pasta water or chicken stock can be used) Top with grated pecorino romano cheese.
This will feed an army!
Cooks notes:
·You can substitute two 19-ounce cans chickpeas, drained and rinsed, for cooked dried ones.
·To quick-soak chickpeas, cover with water by 2 inches in a medium pot and bring to a boil, then boil 1 minute. Remove from heat and cover, then soak 1 hour. Drain, discarding water.
·Chickpeas can be cooked 2 days ahead. Cool completely and chill (in cooking liquid), covered.
·Sauce, without parsley, can be made 2 days ahead and chilled, covered. Reheat, stirring in parsley.
Click here for a printable version of this recipe.

Fried Chicken Fears Extinguished

I have a confession to make. This normally fearless girl in the kitchen has been freaking out about making fried chicken. I chose a southern theme for my Dinner Divas dinner group this month and thought it would be fun to tackle fried chicken. Fun idea but it really scared me. I actually had dreams about it. I kept visualizing myself starting a fire. Ive never dealt with that much hot oil before and I all I could do was picture the worst. I woke up early Saturday morning to clean the house and prepare for the dinner. I stalled for as long as I could until I realized I only had an hour before the girls would arrive. I took out my le creuset but then I thought it wasnt deep enough and pictured the oil boiling over. I decided to use the largest, deepest pot I had, my All Clad pasta pot (I know, Im a kitchen label whore).
.JPG) I had two containers of peanut oil (waaay too exepensive by the way) and that didnt even fill up the pot halfway, so I added in canola oil until the oil was about halfway up the pot.
I had two containers of peanut oil (waaay too exepensive by the way) and that didnt even fill up the pot halfway, so I added in canola oil until the oil was about halfway up the pot. .JPG) That was a lot of oil and it took a long time to come to temperature! Good thing my buddies over at bakespace recommended a deep frying thermometer or I would have been in big trouble. Ever put a piece of meat or veggies into a pan of oil thats not hot enough? Yuck! The meat will absorb all the oil and youll end up with a greasy, soggy, mess. I followed the directions on the recipe exactly and was thrilled with the result. The chicken was perfectly moist and crisp! I was soo excited about it! I dont have to be afraid of deep frying ever again! Ill be honest though, I wont be in a rush to do it again because not only is it fattening but two days later and my house still smells like a fast food joint.
That was a lot of oil and it took a long time to come to temperature! Good thing my buddies over at bakespace recommended a deep frying thermometer or I would have been in big trouble. Ever put a piece of meat or veggies into a pan of oil thats not hot enough? Yuck! The meat will absorb all the oil and youll end up with a greasy, soggy, mess. I followed the directions on the recipe exactly and was thrilled with the result. The chicken was perfectly moist and crisp! I was soo excited about it! I dont have to be afraid of deep frying ever again! Ill be honest though, I wont be in a rush to do it again because not only is it fattening but two days later and my house still smells like a fast food joint. Heres the recipe that I used. Paula uses 1 whole cup of hot sauce. That seemed a bit excessive so I used about half that. Turns out I couldnt taste the spice at all. A friend said that since it was being deep fried it wouldnt really be that spicy if I used it all. So next time Ill add more. This recipe is guaranteed not to fail you, so if you ever get up the nerve to deep fry some chicken this is the recipe to try!
Paula Deens Southern Fried Chicken
6 to 8 servings
Ingredients:
3 eggs
1 cup hot red pepper sauce
2 cups self-rising flour
2 1/2 pound chicken, cut into pieces
Directions:
House Seasoning, recipe follows
Oil, for frying, preferably peanut oil
Heat the oil to 350 degrees F in a deep pot. Do not fill the pot more than 1/2 full with oil.
In a medium size bowl, beat the eggs. Add enough hot sauce so the egg mixture is bright orange (about 1 cup). Season the chicken with the House Seasoning. Dip the seasoned chicken in the egg, and then coat well in the flour. Place the chicken in the preheated oil and fry the chicken in the oil until brown and crisp. Dark meat takes longer than white meat. Approximate cooking time is 13 to 14 minutes for dark meat and 8 to 10 minutes for white meat.
House Seasoning:
1 cup salt
1/4 cup pepper
1/4 cup garlic powder
To make the House Seasoning, mix the ingredients together and store in an air-tight container for up to 6 months.
Tip - Have a cookie sheet lined with a supermarket paper bag and a cooling rack ready to go. As you remove the chicken place it on the rack so it stays crispy but the excess oil is removed. The brown bag is for clean up, it makes your pan easy to wash, no greasy mess to deal with.
Do not throw oil down your drain, you husband, wife, boyfriend, girlfriend, mother, whoever will KILL you! Seriously, it will clog the drain. I was wondering how I was going to get rid of this oil and I had one of those lightbulb moments. You know the ones where you feel really stupid that it took you so long to figure out. I just used the empty oil containers. A funnel would be really handy for that. If you dont have empty bottles just use a coffee can. Make sure you wait for the oil to cool!!!
Wednesday, January 29, 2014
Dum Idli

Ingredients
Idly rice-2cups
Toor dal( split pigeon peas)-1/2cup
Bengal gram dal( split chick peas)-1/2cup
Urad dal( black gram lentils)-2tbsp
Curd/ Yogurt-1/2cup
Green chilly( broken)-3
Ginger minced-1"
Coconut shredded-1/2cup
For tempering
Mustard seeds-1tsp
Asafetida- pinch
.JPG)
Method
Wash and soak the dals and rice together for 2 hours. Grind them into coarse paste. In a large bowl add the curd and 1/2 cup of water and dilute into thin consistency. To the curd mixture add salt, green chilly, coconut and minced ginger. Heat 2tsp of oil in a small tadka pan, add the tempering ingredients. When the mustard crackles, add the hot tempering to the curd mixture. Now mix in the ground dals and rice paste to the curd mixture( the consistency of the dum idly batter should be thicker than the dosa batter).
.JPG)
1.My grannys method of preparation is putting Idly batter on dum which is authentic and requires little effort.
All we need is a large aluminium vessel with a flat lid. Next place the aluminium vessel on a burning charcoal. Heat generous oil in the vessel( since the entire batter is poured and cooked in the vessel). When the oil is hot, pour the entire batter into the vessel. Cover tightly with the lid and place some burning charcoal on the top of the lid. In this method the idly batter cooks both from the bottom and top. We need to cook idly for at least 45 mins to an hour. Once the Idly is cooked, make a slice from the Dum idly and serve. The dum idly will be crispy on the top and bottom and soft inside.
2.My Moms way of preparing Dum Idly, is in kadai/ pan which is easy and tasty.
Heat about 4tbsp of oil in a medium sized kadai, when hot pour about 4 to 5 ladles of batter into the kadai. Cover the kadai with a lid and cook the idly batter on both sides until golden brown and crisp. Make a slices and serve hot
3.And my way of preparation is baking method which is more healthier.
Pre-heat oven to 400°f. Grease a oven proof pan with required oil, pour in the required idly batter. Place the pan in the oven and bake for about 15 to 20 mins. Depending on the amount of batter poured. When done, make slices and serve hot.
Here i had prepared Dum Idly following my moms way which is my familys favorite. Serve Dum Idly with Idly chilly powder or chutney of your choice.
BBQ wings
BBQ wings

Ingredients
- Chicken wings 1 kg
- Crushed garlic 2 tsp
- Salt 1 tsp heaped
- Crushed black pepper 2 tsp
Ingredients for sauce
- Butter 2 ounce
- Brown sugar 4 tbsp
- Wooster sauce 3 tbsp
- Mustard paste ½ tsp
- Ketchup ¼ Cup
- BBQ sauce ¼ cup
- Garlic powder 1 tsp
- Chili sauce
- Cinnamon powder ¼ tsp
- Paprika ½ tsp
- Chili powder 1 tsp
- Salt ½ tsp
- Black pepper ½ tsp
Method for sauce
- Heat butter add all the remaining ingredients, cook tills sauce slightly thick
Method for wings
- Marinate wings with crushed garlic, salt and black pepper crushed, put in a greased pyrex dish in a single layer, bake for 30 to 40 minutes on 180 degree C, turn wings after 20 minutes, drain any liquid from the wings, pour the sauce on the drained wings, bake for another 15 minutes, serve with sprinkled with coriander leaves or parsley.
Tuesday, January 28, 2014
Oatmeal Chocolate Chip Cookies
1/2 pound (2 sticks) margarine or butter, softened
1 cup firmly packed brown sugar
1/2 cup granulated sugar
2 eggs
1 teaspoon vanilla
1-1/2 cups all-purpose flour
1 teaspoon baking soda
1 teaspoon cinnamon
1/2 teaspoon salt (optional)
3 cups uncooked oats
1 cup chocolate chips
About 4 Dozen
1 cup firmly packed brown sugar
1/2 cup granulated sugar
2 eggs
1 teaspoon vanilla
1-1/2 cups all-purpose flour
1 teaspoon baking soda
1 teaspoon cinnamon
1/2 teaspoon salt (optional)
3 cups uncooked oats
1 cup chocolate chips
1. Heat oven to 350 degrees F.
2. Beat together margarine and sugars until creamy.
3. Add eggs and vanilla; beat well
4. Add combined flour, baking soda, cinnamon, and salt; mix well.
5. Stir in Oats and Chocolate chips; mix well.
6. Drop by rounded tablespoonfuls onto ungreesed cookie sheet.
7.Bake 10-12 minutes or until golden brown.
8. Cool 1 minute on cookie sheet; remove to wire rack.
About 4 Dozen
Bar Cookies: Bake 30-35 minutes in ungreased
13x9-inch metal baking pan
posted by Taylor H.
posted by Taylor H.
Spaghetti Carbonara

This picture does not capture the beauty of this dish. Its not just this picture but every picture I have taken and this is the second time Ive taken pictures of it for my blog. To solve this little problem you must come to my house so I can show you how to make this and so we can make it together.
Im going to admit that it took me try after try to truly perfect this recipe. Ive always loved it but sometimes its too wet, sometimes its too dry, sometimes its really just eggs and pasta (what I call Poor Mans Carbonara) but this time I got it right. Its just how I like it. Creamy without being too saucy, flavorful but with a balance of flavors, not too yellow, not too white, its just perfect...for me. Give it a try, play with the measurements and ingredients, find your perfect balance. Let me know how it works out for you.
Spaghetti Carbonara
1 medium onion, diced
6 slices of bacon, diced
1 clove garlic, minced
1/4 cup pinot grigio (usually i use a dry white but I love the sweetness with the bacon and onions)
1/4 chopped fresh parsley
1 lb spaghetti
3 eggs beaten
2 tbsp heavy cream or milk
1/2 cup or more of romano cheese
salt and pepper
extra virgin olive oil
Directions:
1. Bring a large pot of water up to a boil and season generously with kosher salt.
2. While water comes to a boil, cook bacon in large pan and cover with a splatter shield so you dont burn yourself. When bacon is cooked remove with a slotted spoon and drain on paper towels. (At this point completely ignore the pool of grease on the paper towel, it will all be worth it in the end, I promise.)
3. Add a tablespoon of oil to the bacon drippings and saute onion and garlic. Deglaze the pan with wine and use a wooden spoon to pick up the bits of bacon that stuck to the pan. The cooking term for the tasty morsels (if you care) is called "fond". Once most of the liquid has evaporated turn off the heat.
4. Cook pasta in salted boiling water. While pasta cooks, beat eggs, cream and grated cheese in a small bowl and set aside.
5. When pasta is al dente remove with tongs and add to the pan with onions reserving about 1/2 cup of pasta water. Toss in bacon.
6. Slowly add 1/4 cup of hot pasta water to the eggs whisking quickly to temper the eggs to prevent scrambling. Toss with hot pasta, sprinkle with parsley and add if it seems very dry add more of the pasta water but only if you need it. Top with more romano cheese.
Serve immediately!


Monday, January 27, 2014
Chicken Cacciatore The Official Recipe of Bad Italian Hunters
 For decades Ive made and enjoyed chicken cacciatore without ever realizing what a terrible name it has. Chicken cacciatore basically translates to "hunters-style chicken." So, whats wrong with that you say? What kind of lame-ass hunter settles for chicken??
Are you telling me the proud, cunning hunters of Italy have allowed their official dish to use chicken as the main ingredient? Wheres the dangerous wild boar? How about hard-to-shoot pheasant? I mean how hard is it to hunt chicken? My hunting skills are only slightly better than Paris Hilton, yet I could shoot a damn chicken.
Sorry to have to call you out, Italy. Dont feel too bad; you still have your cooks, artists, lovers, and opera singers to be proud of. All that being said, chicken cacciatore is a very delicious dish, and this video recipe shows my favorite version. Enjoy!
Ingredients:
2 tbsp olive oil
1 whole roasting chicken, cut in quarters
salt and fresh ground black pepper to taste
1 large onion, sliced (so they hold together, slice the onions "with the grain" in the same direction as the lines of the onion, instead of across the onion like they are usually sliced)
8 oz fresh mushrooms, quartered
4 cloves garlic, sliced
3 springs rosemary
1 tsp dried oregano
1/2 tsp red pepper flakes, or to taste
1 cup tomato sauce
1/2 cup water
2 red bell peppers, sliced
2 green bell peppers, sliced
 * Please help support free video recipes, and visit my new sponsor, MOZO Shoes. Find out why chefs (like me) are buzzing about their great shoes!
Join the Party
Join the party and become a follower. we have a great giveaway going on now and a give away going on every Monday through October! Will also be doing another apron giveaway as well so be on the look out! And i must say our aprons are to die for... member these and how cute they were?
Also a big thanks to our reader s and your great emails and yummy recipes. We are loving all the comments we have been getting too! keep it up and a big thank you! Your awesome
Read More..
Also a big thanks to our reader s and your great emails and yummy recipes. We are loving all the comments we have been getting too! keep it up and a big thank you! Your awesome
Egg Pesto on Grilled Gluten Free Toast
 |
| Egg and pesto on grilled gluten-free toast. |
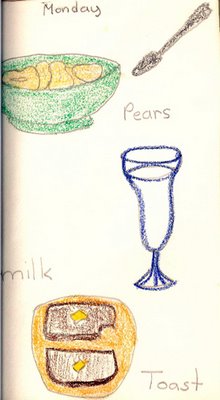
Were getting our Cape Cod house ready to sell. In the midst of weeding out and recycling, I stumbled upon this ancient menu- circa age nine. Apparently I was big on toast. Not to mention, canned peaches. And glasses of milk. A dozen yellowed pages stapled together as my very first cookbook.
All comfort food (no big surprise).
Since going gluten-free, we dont eat much toast. But once in a blue moon I make a pretty tasty gluten-free Italian-style loaf and freeze the slices for grilled sandwiches and brunch.
After a morning of cleaning and packing we decided to finish up the last few slices from a Gluten-Free Pantry Country French Bread Mix I baked last week. Slathered with Our Favorite Basil Pesto and topped with an egg fried sunny side up, it was a dish my nine-year-old self would have appreciated. Simple. And fast.
And did I mention, on toast?
Egg + Pesto on Grilled Toast Recipe
Grilling gluten-free bread in a little olive oil covers a multitude of sins. No kidding. Add a bit of chopped fresh garlic and basil pesto and youll have a serious treat. No deprivation in sight.
Ingredients:
4 slices of your favorite gluten-free bread
Extra Virgin Olive Oil, as needed
Prepared Basil Pesto
4 fresh large organic free-range eggs
Sea salt & fresh ground pepper
Shredded Parmesan, or vegan shreds, as needed
Instructions:
Lightly toast then grill the bread in a large skillet with enough olive oil to coat both sides of the toast.
Grill till sizzling and golden.
In the meantime, in a separate skillet, fry the eggs to your liking- over easy or sunny side up. Season with sea salt and fresh ground pepper.
Spread a generous slather of pesto on each grilled toast. Top with an egg and sprinkle with Parmesan.
Serves two.
Recipe Source: blogspot.com
All images & content are copyright protected, all rights reserved. Please do not use our images or content without prior permission. Thank you.
Sunday, January 26, 2014
Chinese Chicken Salad
 This recipe is for easy, light, and delicious Chinese Chicken Salad. I thought it would be good to post something lighter before everyone eats their weight in turkey, stuffing, and mashed potatoes this week. I love this salad. I just kind of throw everything in, so the amounts will vary depending on what you like, but the dressing is measured and very easy. Here you go!
Chinese Chicken Salad
lettuce (I usually use iceberg)
chopped celery
chopped green onions
slivered almonds
mandarin oranges (I just use a can)
cooked chicken, chopped
crunchy chow mein noodles
Dressing:
1/4 c. vegetable oil
2 T. sugar
1 T. soy sauce
2 T. rice vinegar
1/2 tsp. sesame oil*
1/4 tsp. crushed red pepper flakes
Mix together. Toss with salad just before serving. Yum!
*If you dont have it, you can use a little bit of creamy peanut butter. Sounds weird, but it tastes pretty good. Of course, sesame oil is best.
Originally posted 11/24/09
Cooking with Flowers A Review

Cooking with Flowers by Miche Bacher of Mali B Sweets
I really love this book. The idea of eating flowers is not new to me, however it seems that there are many more flowers you can eat than I thought! Despite the fact that I have browsed through the glorious pages of pretty food several times a week since I got my review copy, I have so far failed to make anything. I am putting that down to the late spring and summer as I have no marigolds, nasturtiums or dianthus yet. I had hoped to make Dandelion Cookies, but just when I had time to do it, our verges were strimmed and I managed to find only ONE dandelion in flower.

As I need to write my review, it is going to have to be without trying a recipe, but I promise I will come back to make some of the enchanting recipes in this book. Ive planted Calendula (Marigolds) and Nasturtiums so hope to eat those later, I even bought some dianthus at the garden centre, such is my determination to eat flowers.
The Author:
Miche Bacher is a herbalist, chef, and founder of the custom confectionery studio Mali B Sweets (Malibsweets.com), which she operates with Nanao Anton. She lives in the waterfront village of Greenport, New York with her husband, Noah, her sons Jordan and Elijah and their dog, Mali.
Introduction:
Why Eat Flowers? Did you know that Brussel Sprouts were a flower? Ha! thought that would surprise you, so I think this part of the book should really be, you already eat some flowers so why not try some more?
From Garden to Table: here you learn about how to gather, prepare and measure flowers so they are suitable to use for culinary purposes.
After these two chapters we move straight on to the flower chapters in alphabetical order. Each chapter tells you about what the flower means in the language of flowers e.g Calendulas signify sacred affections, joy, grief and remembrance, then there is a bit of background or history of the flower, information on culinary use, seasonality, preparation and measure.
Calendula
I do love these Pot Marigolds with their bright cheery faces and they are very easy to grow. Recipes include: Calendula Cornbread, Calendula Quiche, Calendula Ravioli, Calendula Orange Cake, Flowerfetti Cake and Calendula Cookies.
Dandelions
Usually we have loads of dandelions and I am cursing them seeding all over the place, but as I said earlier, no sign of them when you want them! Recipes include: Dandelion Wine, Dandelion Muffins, Dandelion Blossom Cake, Dandelion Ham and Egg Cups and Dandelion Cookies.
Daylilies
Now this was a surprise to me, I had no idea you could eat these rather exotic looking flowers. Recipes include: Gouda Cheese Daylily Biscuits, Daylily Petal Salad, Roasted Daylily buds known as poor mans asparagus and Daylily Curry.
 |
| Me and my bouquet |
 |
| My wedding bouquet |

Dianthus
These Pinks are probably my favourite flowers of all, I simply adore their clove like smell and that was what I wanted in my wedding bouquet along with daisies. I didnt know it at the time, but according to this book, Dianthus stands for love, fascination, distinction and pure affection. I must have chosen well as we will be celebrating our 32nd wedding anniversary this year! I had to make do with commercial carnations and marguerites to create the effect which unfortunately didnt have the glorious scent. Im waiting excitedly for the weather to improve so my pinks will flower and then I can eat them. Recipes in this chapter include: Pickled Pink Petals (Pick a Peck of Pickled Pinks), Dianthus Spiced Chocolate Cookies, Pink Tuiles and Pink Rose Wine Cake.
Elderflowers
These are one of the better known culinary flowers, we used to have a nice tree at the top of our road, but it got kind of leggy and stopped producing nice flowers and fruit, so it got cut down. There dont seem to be many Elderflowers around our area this year. Anyway, if you have some then this chapter has the following recipes: Elderflower Fruit Salad, Almond Elderflower Pound Cake, Elderflower Marshmallows, Elderflower Lemon Cakelets and Elderflower Blueberry Cobbler.
Geraniums
This is the Perlagonium or Cransebill. For best flavour you need to use scented geraniums, it is the leaves rather than the flowers that give the bulk of the flavour and scent. Recipes include: Chocolate Dipped Orange Geranium Cookies, Rose-Scented Geranium Filo Cups and Geranium Angel Cake.
Herb Flowers
This chapter covers Basil, borage, chamomile, chive, lavender, oregano, rosemary and sage, recipes include: Herb Flower Pesto, Herb Flower Shortbread, Blackberry Borage Fool, Borage Spritzer, Creme Fraiche Chamomile Ice Cream, Popcorn Chive Blossom Cupcakes, Lavender Mango Sandwich Cookies, Chocolate Lavender Biscotti, Lavender Lemonade, Rosemary Flower Margueritas and Rosemary Flower Madeleines.
Hibiscus and Hollyhocks
These are rather more exotic flowers and certainly dont grow in my Scottish garden. They look fantastic though and you can make the following recipes with them: Hibiscus Chutney, Hibiscus Chilli Caramel, Hibiscus Cream Pie, Hollyhock Scones and Hollyhock Clafoutis.
Lilacs
The heady scent of lilacs is enough to make you want to eat the, but it seems that the cleaning and preparation is quite time consuming. If you are up for putting in the time for preparation you can make: Lilac Pavlova with Lime Sorbet and Lilac Blackberry Syrup, you have to see the picture of the Lilac Sorbet to believe how incredibly intense the colour of the purple lilacs is, one to impress. I love the sound of White Pepper Thumbprint Cookies and Lilac Jam ( more info on making flower jams later in the book).
Nasturtiums
These peppery and spicy plants are popularly used as a salad herb, they are really easy to grow and give a great show all summer. Here are some of the ways you can eat them: Corn and Black Beans with Nasturtiums, Nasturtium Pizza, Goat Cheese and Nasturtium Ice Cream and Nasturtium Thumbprint Cookies,.
Orchids
Who would have thought that orchid petals taste of cucumber and endive and are popularly used in stir-frys, dessert decorations and a Turkish icecream called, sahlep? Here are some recipes to whet your appetite: Thai Orchid and Beef Salad, Orchid Seafood Saute, Orchid Pineapple Upside-Down Cake and Passionfruit Orchid Tartlets.

Pansies and Violas
Ive often used pansies and violas in salads but here are some of the other ways suggested: Pansy Petal Pancakes, Pansy Lollipops, Pansy Tea Sandwiches and Pansy Rhubarb Galettes.
Roses
How delightful to be able to enjoy the sight, smell AND taste of roses! Lets start with Cardamom Cake with Raspberry Rose Mascarpone (yes, please!), or maybe some Pistachio Rose Shortbread or some Fig and Rose Cream Trifle?
Squash Blossoms
When youve had your fill of courgettes or other squash, why not eat the flowers? Squash Blossom Tempura is a simple dish of deep fried blossoms, Squash Blossom Quesadillas combines the blossoms with tortillas and fresh cheese, you can also stuff the blossoms, the Stuffed Squash Blossoms in this book are stuffed with quinoa and goat cheese.
 |
| My mother-in-law grew this fab sunflower last year |
Sunflowers
We are all aware of sunflower seeds and oil, the petals are not great eating but the unopened bud, apparently, tastes like steamed artichokes. Recipes include: Sunflower Bread, Steamed Sunflower Buds, Sunflower Chickpea Salad and Carrot Sunflower Sandwich Cookies.

Tulips
Another surprise to me and another flower that tastes of cucumber. Ive also learned that the paler the tulip the better it tastes. Recipes include: Tulip Martinis, Tulip Ice Cream Bowls and Spring Tulip and Pea Shoot Salad.
Violets
Typically violets are eaten whole or candied, here are some recipes using violets: Violet Teacakes, Potato Salad with Violet Vinaigrette, the Violet Flower Cupcakes are very pretty as are the Violet Macarons.
The Basics
This chapter provides simple recipes for stocking up including Dried Flowers, Flower Sugars, Candied Flowers, Flower Simple Syrups, Flower Syrups, Flower Rock Candy, Flower butters and Flower cheeses, Flower-Glazed Cheeses, Flower Jams, Flower Vodkas, Flower Ice Bowls and Ice cubes, Flower Wines, Flower Teas, Flower Vinegars, Flower Vinaigrettes, Flower Whipped Creams, Flower Pastry Creams, Flower Frostings, Flower Buttercream Frostings, Flower Ice Creams, Flower Sorbets and Flower Lemonades.
Sources
The sources are for the USA.
Who is this book for?
This is a beautiful book, even if you never made a recipe it would be worth having just to read about and look at all the fabulous photographs. If you are interested in more adventurous cooking and would like to expand your horizons to make stunning dishes that impress the eyes and the palate, then I would recommend you get this book.
Pros
I learned a lot from reading Cooking with Flowers and really enjoyed all the information provided with the recipes. The amazing photography by Miana Jun is matched by the excellent styling (I couldnt find an acknowledgement for the styling) of the recipes.
Cons
The recipes are in US measures, there is a metric conversion chart at the back but that could be a bit of a nuisance if you dont own a set of US measuring cups. I think it would be worth buying a set just to make some of these recipes, they are not expensive and I found it easy enough to get used to using them.
Worth Buying?
Definitely. There is even a link to some exclusive recipes that the publisher couldnt fit into the book. Bonus recipes for the medicinal and cosmetic use of flowers and downloadable recipe cards.
Cooking with Flowers
By Miche Bacher
Published by Quirk Books
Distributed in the UK by PGUK
Price: £10.87 (Popular online bookseller)
Thanks to Mat for asking me to review Cooking with Flowers, I was not paid for this review and all views are my own.
Saturday, January 25, 2014
Smoky Paprika Tomato Soup
Tomato season is winding down, but there are still some available. The smoky paprika and pepper flavours add a rich, autumnal touch to this soup, and its getting cool enough that soups are starting to be welcome. This soup is quite intense in flavour, and some sour cream or yogurt would help make it a little more mellow.
I used 10 large field tomatoes to get 8 cups of diced tomatoes.
Note: Oops, I had a nagging feeling when I posted this that something was missing. There was. I have fixed it.
8 servings
30 minutes prep time

Mix the Spices:
1/4 cup soft unbleached flour
2 tablespoons sweet Hungarian paprika
1 teaspoon sweet smoked paprika
1/4 to 1/2 teaspoon hot smoked paprika
1 teaspoon rubbed oregano
1 teaspoon salt
Mix in a small bowl and set aside.
Make the Soup:
8 cups peeled, diced tomatoes
2 medium onions
1 or 2 sweet red frying peppers (optional)
2 to 3 cloves of garlic
1/4 cup mild vegetable oil
1/4 cup apple cider vinegar
1/4 cup sugar
Blanch the tomatoes by dropping them into a pot of boiling water for one minute, then transfer them to a sink full of cold water. Peel them and remove the cores, then dice them coarsely.
Peel and chop the onions. Cored, deseed and chop the peppers if using. Red Shepherd, Jimmy Nardello or other sweet red frying pepper would be most appropriate. However, the soup is very good without them as well. Peel and chop the garlic.
Heat the oil in a large skillet. Add the onions and peppers, and sauté over medium-high heat for several minutes, stirring regularly, until they are soft. Sprinkle the flour and spice mixture over and mix in well. Cook for about 5 minutes more, stirring frequently and scraping up the flour as it sticks to the pan and browns. The mixture should be dark, but not burnt. Add the garlic and cook it into the mixture for about a minute, until fragrant.
Add as many tomatoes to the pan as will easily fit. Blend well with the onion and spice mixture, scraping the pan to make sure there is none left sticking to it. Cook until the tomatoes are soft, about 5 to 10 minutes. If you cannot get all the tomatoes in the pan, put the rest of them into a soup pot and bring them to a boil. Simmer them as the rest of the soup cooks in the frying pan.
Blend the soup, including all the tomatoes, in a blender or food processor until very smooth with the vinegar and sugar. Reheat and serve. Very good with a bit of yogurt or sour cream.
Last year at this time I made Lancashire Hot Pot.
Read More..
I used 10 large field tomatoes to get 8 cups of diced tomatoes.
Note: Oops, I had a nagging feeling when I posted this that something was missing. There was. I have fixed it.
8 servings
30 minutes prep time
Mix the Spices:
1/4 cup soft unbleached flour
2 tablespoons sweet Hungarian paprika
1 teaspoon sweet smoked paprika
1/4 to 1/2 teaspoon hot smoked paprika
1 teaspoon rubbed oregano
1 teaspoon salt
Mix in a small bowl and set aside.
Make the Soup:
8 cups peeled, diced tomatoes
2 medium onions
1 or 2 sweet red frying peppers (optional)
2 to 3 cloves of garlic
1/4 cup mild vegetable oil
1/4 cup apple cider vinegar
1/4 cup sugar
Blanch the tomatoes by dropping them into a pot of boiling water for one minute, then transfer them to a sink full of cold water. Peel them and remove the cores, then dice them coarsely.
Peel and chop the onions. Cored, deseed and chop the peppers if using. Red Shepherd, Jimmy Nardello or other sweet red frying pepper would be most appropriate. However, the soup is very good without them as well. Peel and chop the garlic.
Heat the oil in a large skillet. Add the onions and peppers, and sauté over medium-high heat for several minutes, stirring regularly, until they are soft. Sprinkle the flour and spice mixture over and mix in well. Cook for about 5 minutes more, stirring frequently and scraping up the flour as it sticks to the pan and browns. The mixture should be dark, but not burnt. Add the garlic and cook it into the mixture for about a minute, until fragrant.
Add as many tomatoes to the pan as will easily fit. Blend well with the onion and spice mixture, scraping the pan to make sure there is none left sticking to it. Cook until the tomatoes are soft, about 5 to 10 minutes. If you cannot get all the tomatoes in the pan, put the rest of them into a soup pot and bring them to a boil. Simmer them as the rest of the soup cooks in the frying pan.
Blend the soup, including all the tomatoes, in a blender or food processor until very smooth with the vinegar and sugar. Reheat and serve. Very good with a bit of yogurt or sour cream.
Last year at this time I made Lancashire Hot Pot.
Pineapple Cake Recipe
I really enjoyed baking this pineapple cake because it was very exciting to see it easily come out from the loaf tin with all of the pinepaple rings perfectly set in place.
This is a great cake to bake and very filling to eat.
I use ground almonds, oatbran and fresh pineapple in this cake recipe which makes it very wholesome and delicious.
I used white spelt flour but you can use plain all purpose flour if desired.
This pineapple cake recipe is a wheat free recipe and an egg free recipe but it does contain gluten in the spelt flour.
You would never believe that this pineapple cake contains no eggs because it was so fluffy and moist.
I use a glaze on my cake that gives the cake a sticky tasty coating, the glaze also made the cake glisten in the light.
A step-by-step video guide for this recipe will be uploaded soon.


Ingredients for Pineapple Loaf Cake Recipe
1 Small Pineapple
1 oz Oatbran
6 oz White Spelt Flour or Plain White Wheat Flour
2 tsp Candied Peel
3oz Sunflower Margarine
1/2 oz Light Brown Sugar
1 oz Ground Almonds
5oz Honey
1/2 tsp Bi Carbonate of Soda
1 tsp Baking Powder
For the Glaze
1 Tbsp Apricot Jam
1 Tbsp Powdered Sugar (I used golden sugar)
Few Drops of Hot Water
Note....You can use a large tin of pineapple rings instead of fresh pineapple. Just drain off the juice/syrup and use pinepaple slices. Instead of blending the left over pieces of fresh pineapple add 2-3 Tbsp of the tinned pineapple juices instead.
Would you like to taste a piece of Jeenas delicious sticky and moist pineapple cake?


How to make Chef Jeenas Pineapple Cake Recipe
Take one small pineapple and carefully slice off the ends and down the sides of the pineapple to remove all of the skin.

Slice into rings.

Use a ring shape to cut through the centre of each pineapple slice.
Keep all of the left over pineapple pieces.


Place all remaining pineapple pieces apart from the pineapple rings into a blender and blend into a paste, you may need to add a very tiny amount of water to help blend the pineapple.

Use a mixer to mix together honey, margarine, ground almonds, oatbran and sugar.

Add candied peel, spelt flour, baking powder and bi carb mix very well.


Lightly grease a loaf tin.
Layer pineapple rings on top of the other at the bottom of the loaf tin.
Slice pineapple slices in half and place around the sides of the loaf tin.
Layer pineapple rings on top of the other at the bottom of the loaf tin.
Slice pineapple slices in half and place around the sides of the loaf tin.


Pour cake batter into the middle of the loaf tin and spread evenly on top.


Place into a hot oven at 180C for 60 minutes or until a skewer comes out clean.
Do not open the oven door for at least 25 minutes.
Do not open the oven door for at least 25 minutes.

Leave the cake to cool in the loaf tin for at least 15-20 minutes.

Use a sharp knife to carefully ease the cake out of the tin.
Mix together the glaze ingredients and gently dab and brush it all over the pineapple cake.
Mix together the glaze ingredients and gently dab and brush it all over the pineapple cake.


Leave the pineapple cake to cool down completely before slicing and serving.


Step-by-Step Video Guide to this Pineapple Cake Recipe Coming Very Soon!
Check out my cake recipes index page here
Subscribe to:
Comments (Atom)