Showing posts with label and. Show all posts
Showing posts with label and. Show all posts
Sunday, May 18, 2014
Weather Alert western portions of kentucky Christian County westward and includes western Tennessee and parts of Missouri Arkansas Illinois and Indiana
In the early afternoon strong stroms are reported.There is a high probability that severe storms will occur.
NO tornado watches have been issued for western ky so far. But there are lotz of chances for a tornado watch it seems...so frndz be careful.
This is just a warning check for more weather details.....

Thursday, May 15, 2014
Country Spare Ribs and Kraut Braised In Apple Cider with Buttermilk Mashed Potatoes

Usually I wait to have this, rather dull in appearance but huge in flavor, meal until the weather turns a bit colder, but the dinner spirit moved me last night and I had to oblige. The slightly pungent but equally enticing aroma of sauerkraut slowly simmering in the kitchen has no choice but to harken memories of Thanksgiving meals past. I have mentioned many times before that Baltimore, my hometown, has a tradition of serving sauerkraut with most meals wherein poultry is served, but most definitely when turkey is the main attraction. So when the scent of sauerkraut wafts through the house I can not help but feel nostalgic. While sauerkraut and poultry is probably the most common combination, there certainly is nothing wrong with a pairing of kraut and country pork ribs. Serve them along side a pile of billowy buttermilk mashed potatoes and be sure to use the kraut drippings as gravy!
Country Pork Ribs Kraut Braised in Apple Cider
1 large jar of sauerkraut
country pork spare ribs
1 granny smith apple, peeled, seeded and cut into eighths
1 McIntosh apple, peeled, seeded and cut into eighths
apple cider
dry white wine
2 tablespoons fennel seed, coarsely cracked
coarse ground pepper
sea salt
Preheat oven to 350 degrees. In a large oven proof skillet or dutch oven heat 2 tablespoons olive oil over medium high heat until just smoking. Combine fennel, salt and pepper and liberally season pork ribs. Place ribs in hot skillet and brown on all sides. Remove ribs to a plate. Add apples to the skillet and cook just a minute to two to absorb some of the flavor in the pan. Add about 1 cup of white wine and deglaze the pan. Add sauerkraut and pork ribs back to the pan and pour over enough apple cider to cover half way up the ribs. Tightly cover and cook in the oven for 1 1/2 to 2 hours or until pork is tender and falls off the bone.
Buttermilk Mashed Potatoes
Yukon Gold potatoes
milk
buttermilk
butter
chives
salt
pepper
Place potatoes in a large saucepan and cover with cold water. Place over a high burner and bring to a boil. Turn heat down to keep potatoes at a gentle boil and cook for approximately 15 minutes or until they are fork tender. Heat a couple of tablespoons of butter and a 1/2 cup milk or so together. Drain potatoes and return to hot pot. Pour milk and butter mixture over potatoes and mash together. Add several tablespoons of buttermilk and stir vigorously. Add salt, pepper and chives to season and stir to combine. Serve immediately.
Saturday, May 10, 2014
How To Drying Out A Squirrel Tail the Quick and Dirty Way


2. Lay the tail underside up on a flat surface. Cut through the skin and fur along the tail bone with a sharp knife. Make sure you cut the backside of the tail, not the pretty topside.

Only cut down far enough so you can easily pull the tail bone out.


4. Lay the tail flat, salted side up. Store in a dry place outside where neighborhood animals cannot get to.

5. The tail should dry in a week, or sooner, and all the critters living in it will leave. Scrape the salt off the tail, which will be hard and solidified.

There will be some salt sticking to the hide. You can further scrape off the salt with something rough, if you wish.

There you have it! You want to careful when handling this. Since it is not tanned the proper way, the fur may come off if you yank too hard or play with it too much. But, its perfect for tacking up on a wall, to look at and admire.
Check us out on Facebook!
Peanut Butter Ice Cream Vegan and Dairy Free
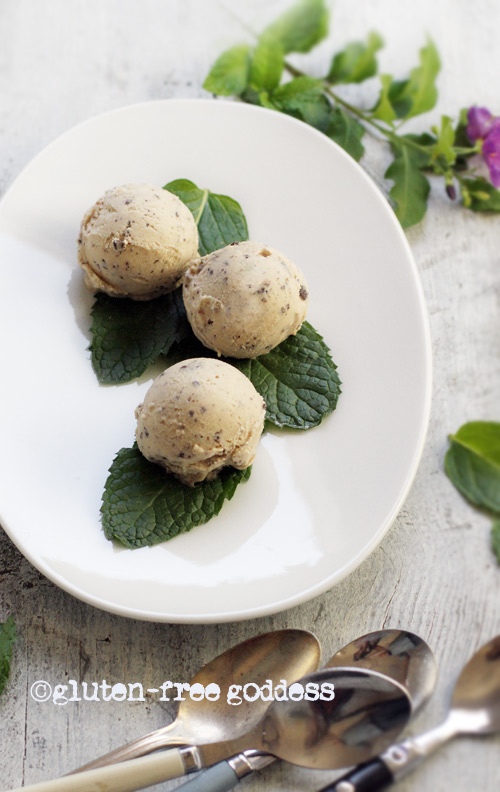 |
| The richest, creamiest vegan ice cream I've ever made. |
It is hot and steamy here in New England. And I am not cooking. I am not even boiling water for my habitual ritual of afternoon tea. I am sitting in front of a petite blue desk-top fan. Eating ice cream. Homemade ice cream, to be exact. With nary a trace of dairy or gluten. And apparently, it is the best homemade ice cream I have ever made (so says my ever willing, taste-testing husband).
Who am I to argue?
It is indeed fabulous.
The inspiration came via one of our favorite Los Angeles restaurants- Akasha, in Culver City. At Akasha you can always find a lovely gluten-free choice on the menu- as well as something vegan, which by default, is dairy-free. A sigh-of-relief option for those of us saddled not only with celiac disease, but a dairy intolerance as well. (As a side note, I have found it harder to dine out dairy-free than gluten-free-- chefs love their butter, cream and cheese. And because they pre-prepare so many items on the menu, it is often impossible to find a dairy-free choice.) One of the gluten-free dessert choices at Akasha is vegan peanut butter ice cream.
It. Is. Simply. Divine.
So I decided to try my hand at re-creating it.
Friday, May 2, 2014
Nannys Baked Rice and A Rice Cooker

Fridays during lent are always meat free for Catholics and when you get tired of pizza or ailo oilo (pasta with garlic and oil) you need to use a bit of creativity. Nanny would make some white rice, mix it with sauce, mozzarella and grated cheese, put it in a pyrex, top it with some breadcrumbs and bake it until the top becomes crispy. It was always very satisfying for me. When I decided to make this for Steve the first time I knew that he would want a little more added to it for it to be considrered a whole meal. Thats how I came up with this. Nannys version is like a rice ball and mine is like a sicilian rice ball. Make this either way or both ways, they are both great. If you dont like peas you can leave them out or put less in. When I made this last night I only had a couple of handfuls of peas in my freezer and it was still great.
Thanks to my friends over at Bakespace I purchased a rice cooker and used it for the first time yesterday. Eric found this great deal for a 3 cup rice cooker for only $9.99!!!

It was great! I never have to worry about my rice being too mushy ever again! The best part is that its small enough for me to find a space for in the closet. That was my biggest concern but it turned out to not to be an issue at all. Thanks Eric and all my bakespace friends!
Nannys Baked Rice
Ingredients:
1 cup of white rice, uncooked
1 can crushed tomatoes
Extra virgin olive oil
3 cloves garlic, minced
1 small onion, diced
1 lb 85% ground beef
1 small package of frozen peas, defrosted
salt and pepper
garlic powder
onion powder
1 tsp dried basil
1 tsp sugar
1 package of shredded mozzarella
Parmesan cheese, to taste
Italian Style breadcrumbs
Directions:
Cook rice, set aside. Meanwhile in a small saucepan sauté onion and garlic in oil until tender. Add basil and let it cook for 1 minute to let flavor release. Add tomatoes. Season with salt, pepper and sugar; if too thick add a little water (swish in can). Let cook for 30 to 40 minutes, taste and adjust seasonings if necessary. While sauce is cooking prepare ground beef. Season beef with salt pepper, garlic powder, and onion powder and brown in a nonstick pan (no oil needed if using a nonstick pan). Be sure to constantly break up meat with a wooden spoon. Drain fat. Ladle a little sauce on the bottom of a large rectangular Pyrex dish to prevent rice from sticking. In a large bowl combine rice, mozzarella, ground beef, peas and Parmesan cheese, adding a little sauce at a time. Do not want it to be too wet or too dry. May not need to use all the sauce. Add mixture to baking dish, spreading out and pressing down with spatula. Sprinkle top with bread crumbs and cheese.
Bake at 350° for 30-40 minutes. Place under broiler to crisp the top if necessary


Wednesday, April 30, 2014
Father Daughter Dance and Life Lessons

Last week I spent a long weekend at home in Houston with the specific purpose of taking a dance lesson with my dad for our father-daughter dance for the wedding. He chose "My Girl" for our dance because it reminds him of the time we went to see Father of the Bride and were late to the showing and had to sit in the very front row for all 105 minutes of the film. I guess my parents remember it differently than I do, because apparently it was a great memory for them! So, since today is also his birthday, I thought I would tell you a little about him so you can truly appreciate how big this was for him.

My dad grew up in the Midwest, which means he likes things like Star Trek and Subway sandwiches. It also means he had an intense desire to get the hell outta there, and worked his ass off to become a successful business person. Today, he has a high-pressure job in IT and works on average 90-1,409 hours a week.


Happy Birthday Dad!
Wednesday, April 23, 2014
Fish and Chips Recipe

How to make Healthier Traditional Fish n Chips
Fish and chips are an all time British favourite take away meal. Chips are usually chunky pieces of potato deep fried, the fish is usually cod, haddock, plaice or coley (white fish) coated in a thick batter and deep fried. Once cooked you sprinkle with salt and malt vinegar, you can eat with mushy peas, bread or just a little tomato ketchup.
You can buy fish and chips from what we Brits call the chippy. In the old days fish and chips were wrapped up in newspaper. Today fish and chips must be sold in a polystyrene tray then wrapped in white paper. You can also eat a portion of chips in cardboard cone.
As you can understand with all this deep frying going on, fish and chips from the local chip shop or chippy has to be a treat and not a meal you eat everyday. But no longer do you have to long for that delicious chippy meal.
Chef Jeena has a fabulous fish and chips recipe that is almost guilt free.
Chefs healthy fish and chips recipe consists of fresh white fish being coated in flour and shallow fried in olive or rapeseed oil. The healthy chips are lightly coated with healthy oil and oven baked instead of deep fried.
This recipe is so very easy and quick to cook so no excuses......get on your apron and taste some homemade healthy fish and chips.


Ingredients for Healthy Fish and Chips
2 White Fish
Flour
Salty and Pepper
Rapeseed Oil (or olive if desired)
Tin Mushy Peas
Oven Baked Chips
Picture of healthy oven baked chips.


Picture of cooked shallow fried white fish.


How to Make Healthy Homemade Fish and Chips
Place your chips in the oven. When you have approx 10 minutes left of cooking the oven chips get started on the fish.

Mix some flour with salt and pepper to season.
Coat your fish on both sides thoroughly.
Coat your fish on both sides thoroughly.

Heat up some rapeseed oil in a large frying pan.
Drop a pinch of the flour into the oil and if it sizzles the fat is ready. You do not want the fat too hot, just enough to get it sizzling.
Place the fish into the pan. Do not move the fish at all for at least 4-5 minutes.

With a spatula gently move some oil over the fish from the side.

Turn the fish over.

Carefully spoon the oil in the pan over the fish.
Cook for a few more minutes.
Cook for a few more minutes.

Turn the fish over cook for another minute or so, spoon over some more oil.
To check if the fish is cooked through you can place a small blunt knife or similar cutlery and insert it into the chunkiest part of the fish, if it comes out hot the fish is ready.


Serve with homemade healthy oven chips recipe and your favourite tin of mushy peas, sprinkle with salt and vinegar.


Enjoy your healthy traditional fish and chips recipe.
Thank you for JeenasKitchen.Blogspot.com Bookmark today!
Recipes updated daily.
Thank you for JeenasKitchen.Blogspot.com Bookmark today!
Recipes updated daily.
Subscribe to:
Posts (Atom)